Profile brewing
Intuitive User Experience
In the midst of features our IoT-enabled profile brewer offers, our primary aim is to ensure that every user enjoys an intuitive and delightful brewing experience.
Brewing the best coffee easily
The essence of the brewing process remains familiar to other brewers:
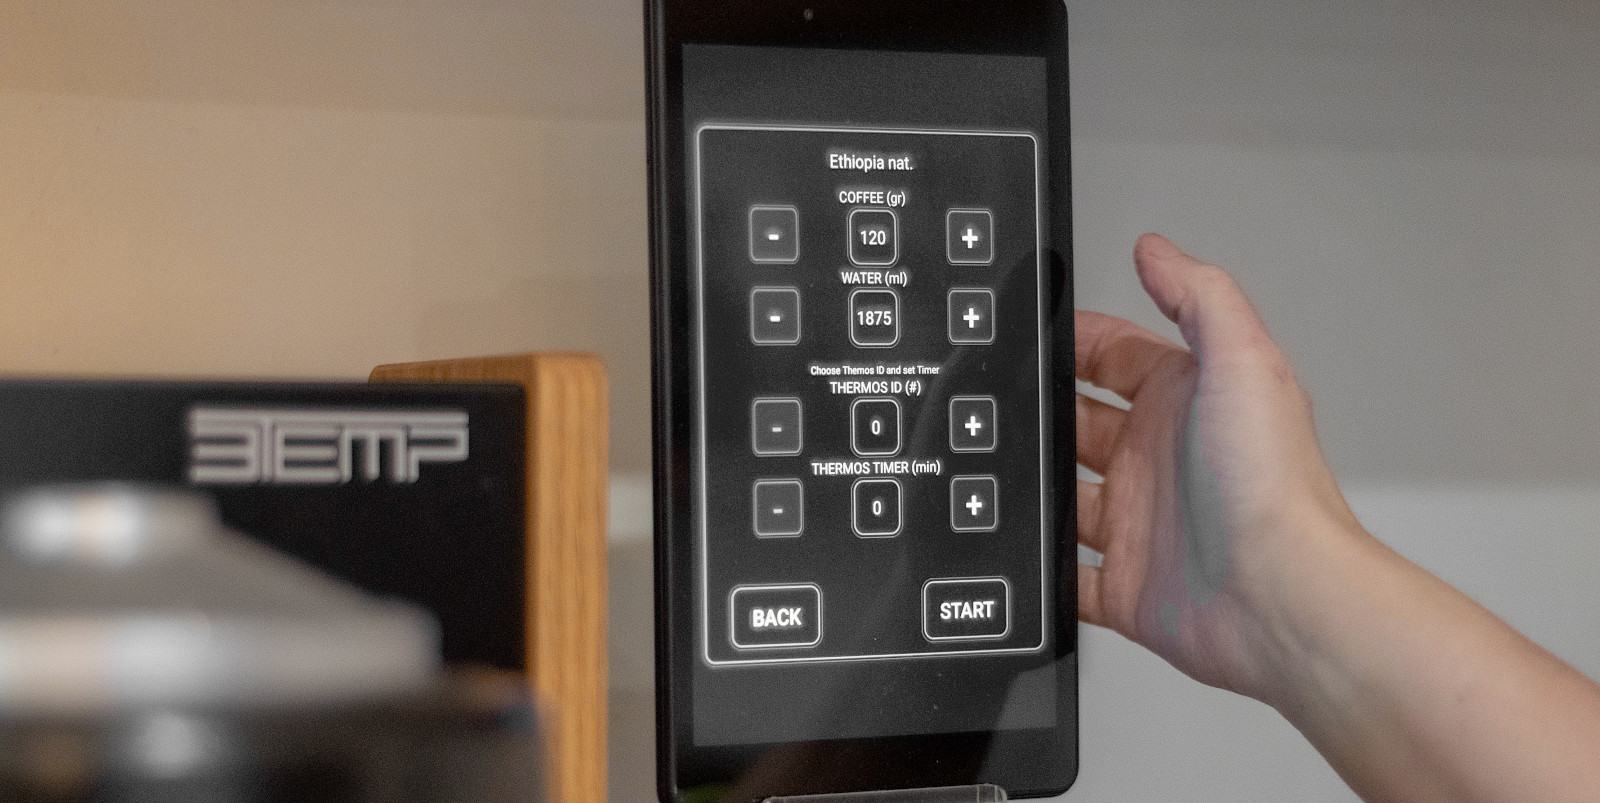
- Set up the thermos
- Insert the coffee filter
- Add coffee grounds
- Position the brew basket
- Begin the brewing process
That’s it – just that simple
What sets us apart is our innovative technique and our passion for the quality in cup. Our patented wide brew hat delivers coffee extraction that’s remarkably effective, promising a superior taste from the very first cup. With the capability to connect to the brewer via the internet, you can effortlessly create brewing profiles and fine-tune recipes, initiate and reset brews, and monitor your statistics while savoring freshly brewed coffee.
What does “profile brewing” mean?
A coffee brewing profile is your ticket to an aromatic journey, where every sip is a unique experience.
Dive into the fascinating world of coffee profiling, where a symphony of factors dances together to create your ideal brew. From the grind size of coffee beans to the precise water temperature, and the brew pulses you adjust using the 3TEMP recipe editor, every element influences the final taste and aroma.
Explore the art of coffee brewing and discover the keys to unlocking your preferred flavor palette. Join us as we delve into the enchanting elements of a coffee brewing profile, where every cup tells a different story.
Creating an individual brewing profile
With the 3TEMP web application, you have the freedom to experiment with your recipe parameters and find the perfect brew. Don’t worry, you can’t go wrong – we promise, the brewer won’t explode!
The recipe editor is structured into basic parameters and the three brewing phases:
- Pre-brew Phase
- Extraction Phase
- End Phase
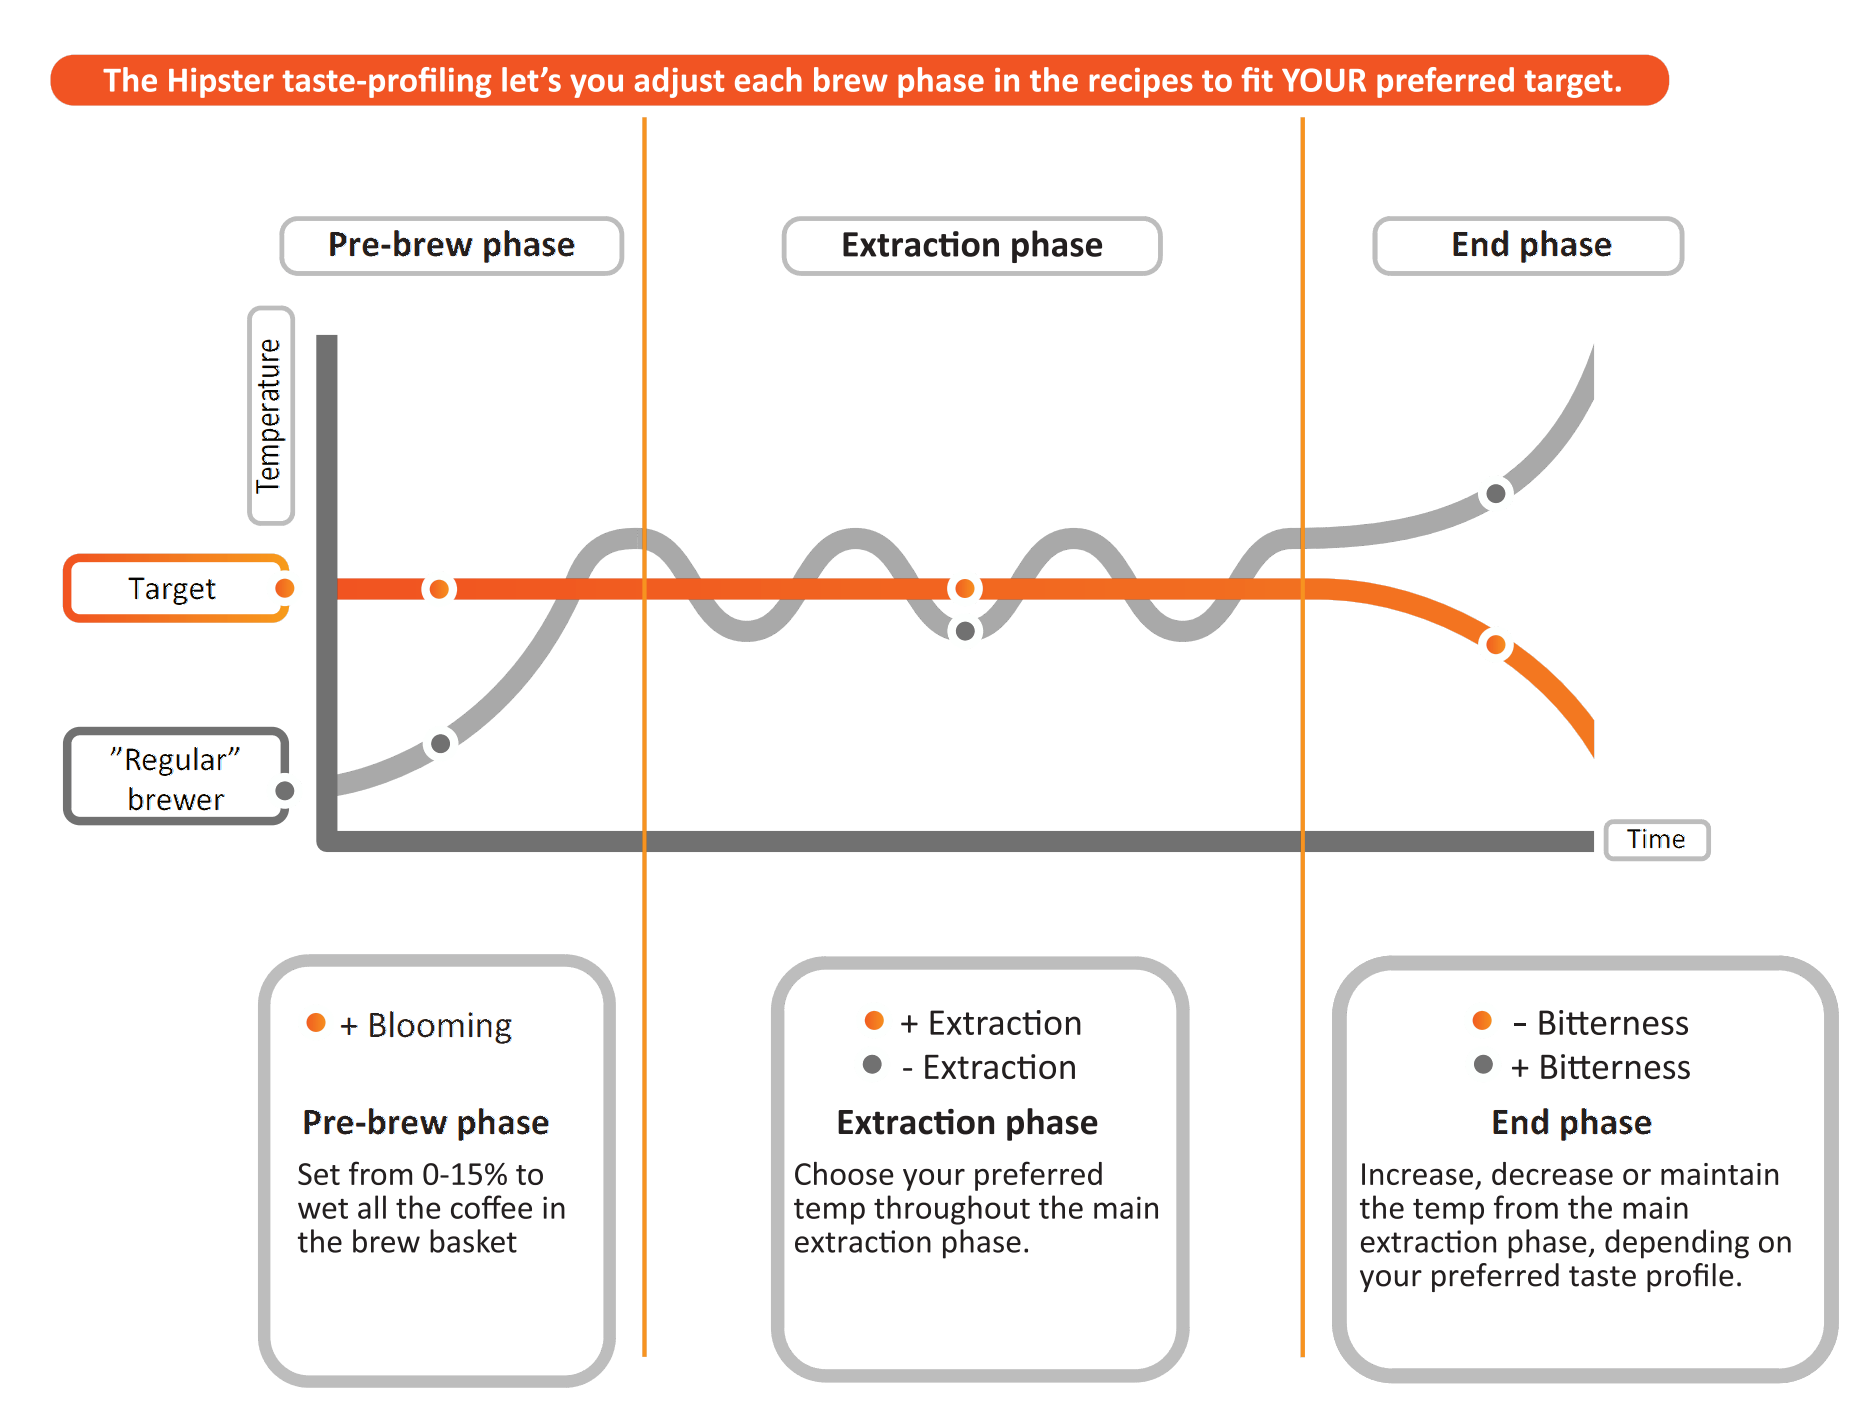
The different phases come with a few factors to consider, such as temperatures, duration, and the use of pulses.
It may not seem complicated at all, and that’s because it really isn’t. However, these parameters enable you to achieve the absolute best when it comes to brewing exceptional filter coffee.
You want to delve deeper?
We kindly suggest a gradual adjustment rather than making all changes at once. By fine-tuning the parameters with each brew, you’ll notice that, apart from the coffee and basic settings, there are just six key parameters to consider. Gaining a clear understanding of these will undoubtedly bring you the joy and satisfaction you’re seeking.
Coffee parameters
Although the coffee parameters aren’t included in the brew recipe, they play a crucial role in shaping the taste:
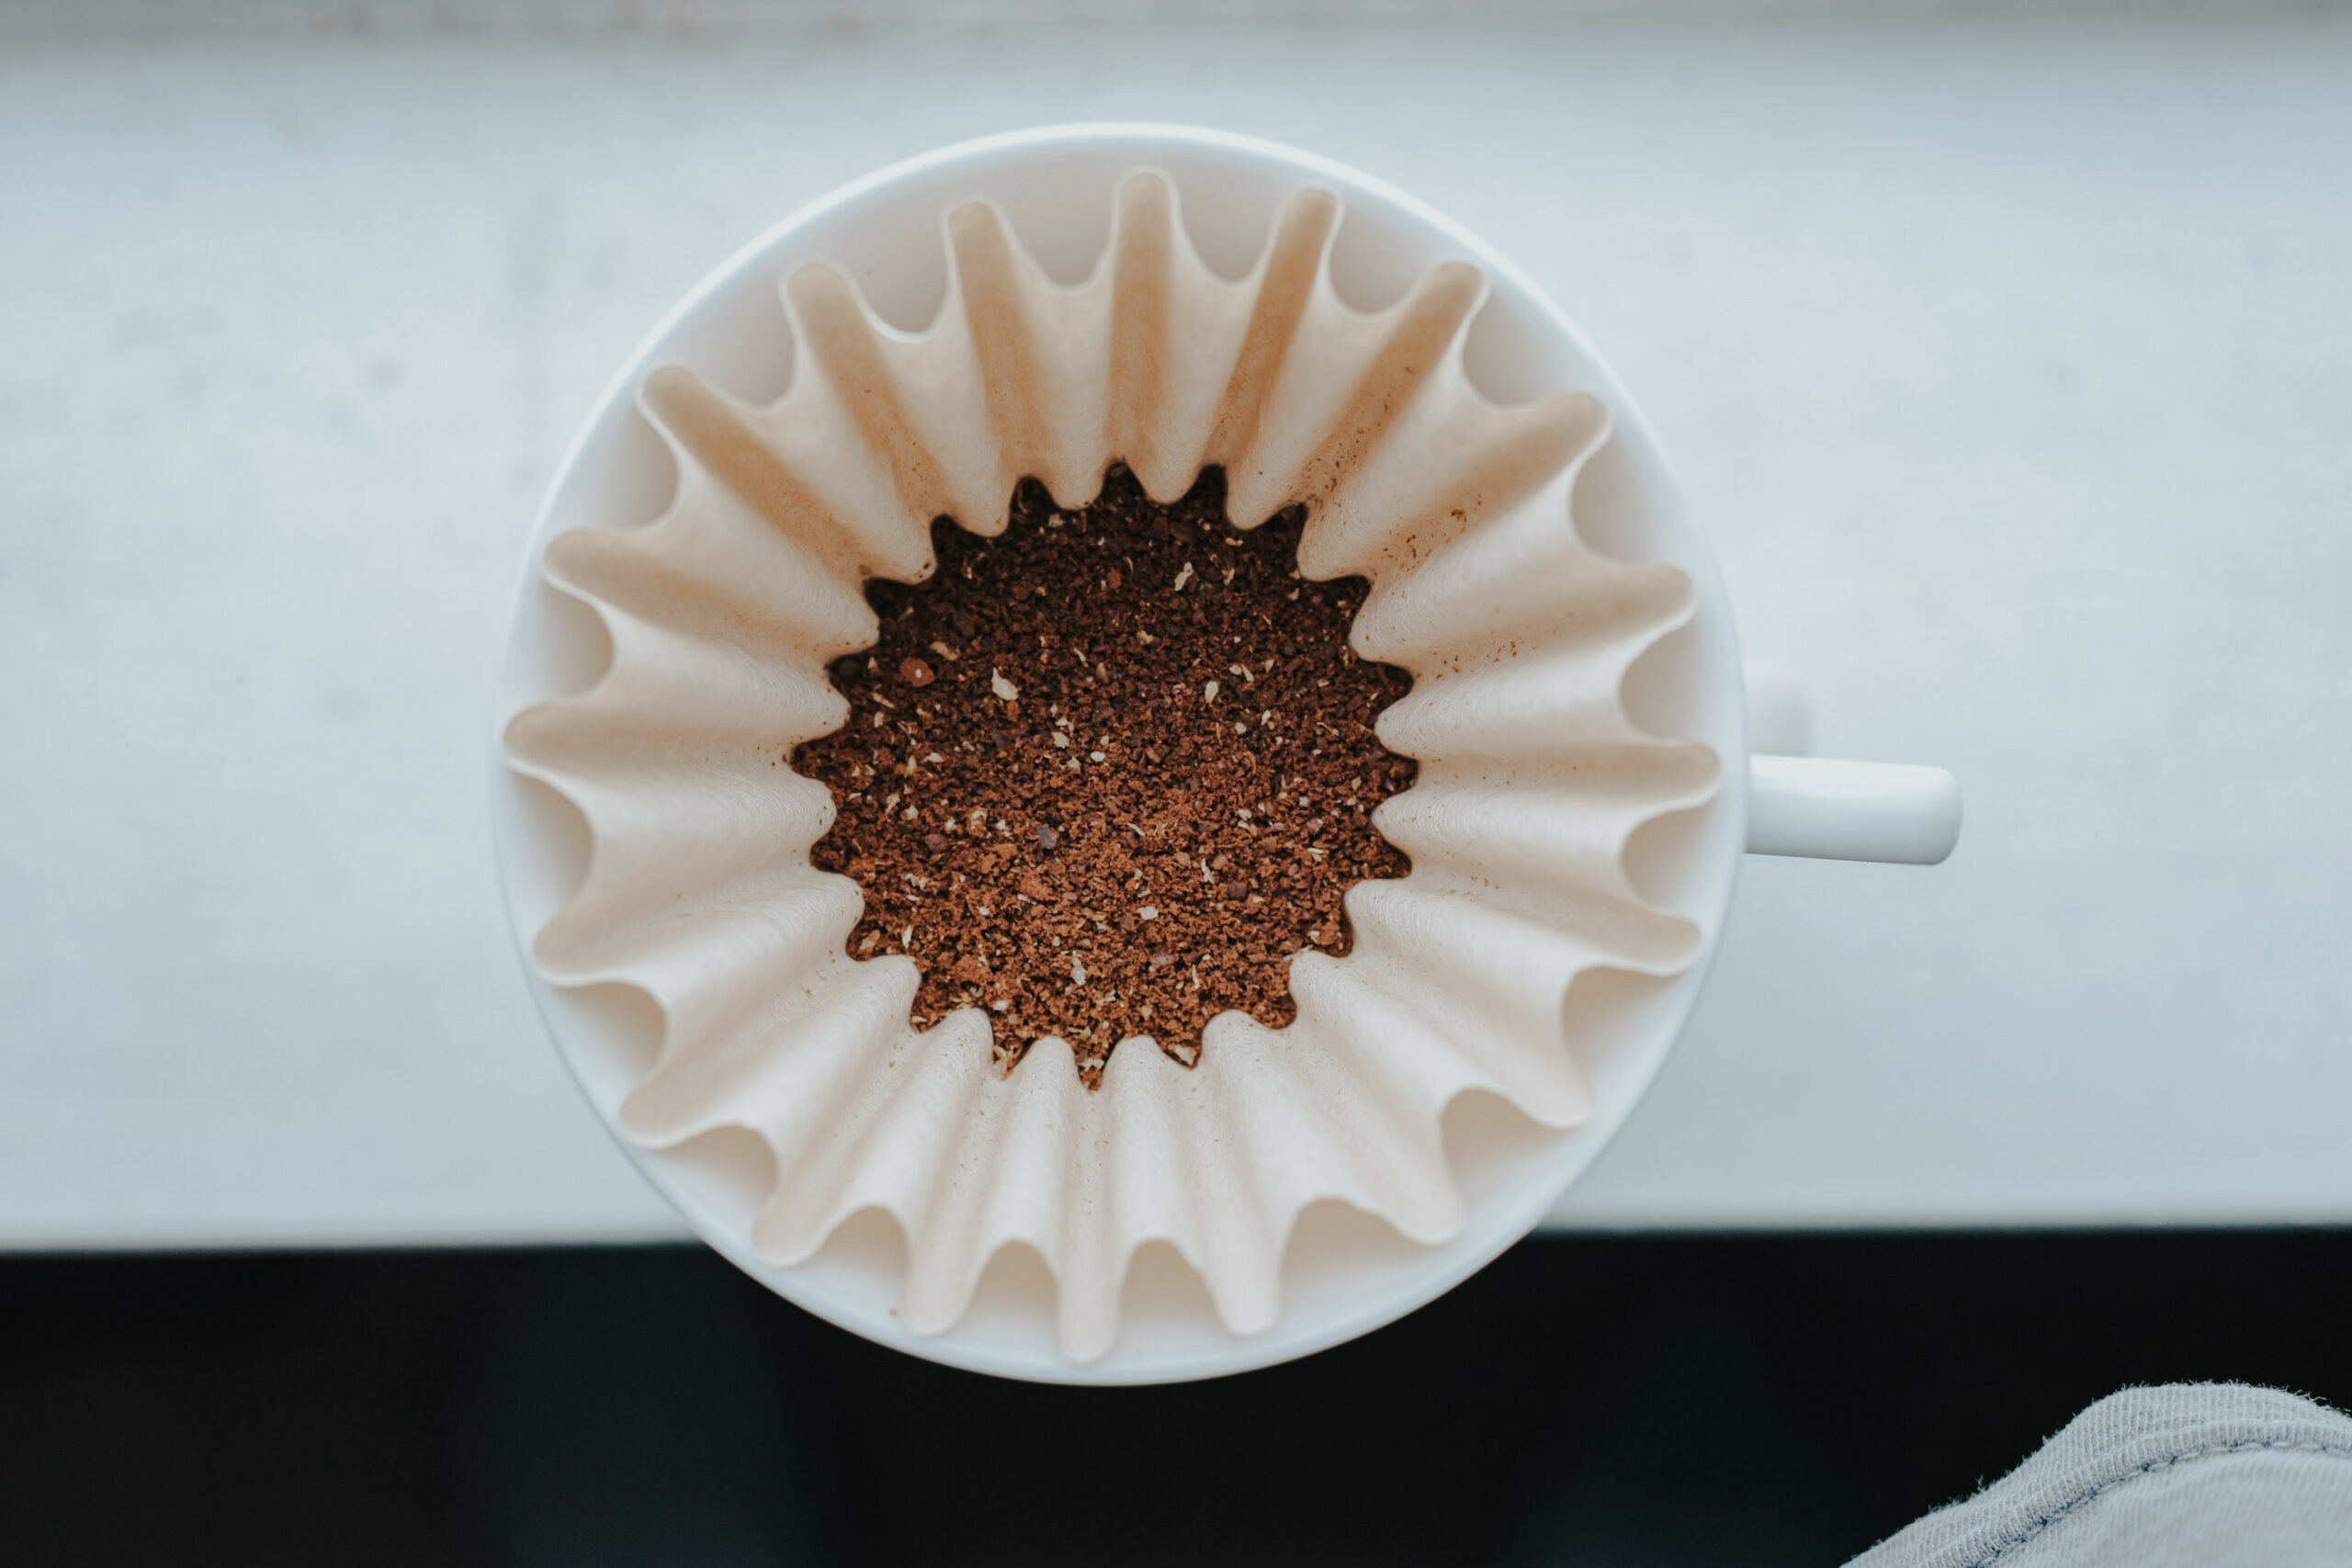
Grind Size:
Taste-effects:
Acidity and Aroma
Recommendations and guidelines:
Grind the coffee to a coarser consistency than what is typically recommended for home brewers.
Roast Level:
The roast level of your coffee beans can influence specific brewing factors, like temperature and pre-brew time. For more details on these parameters and their effects, read on.
The parameters explained:
Please note: The following image is interactive:
To see explanations for different parts of the image, simply click on them, and the descriptions will appear below the Recipe Editor image.
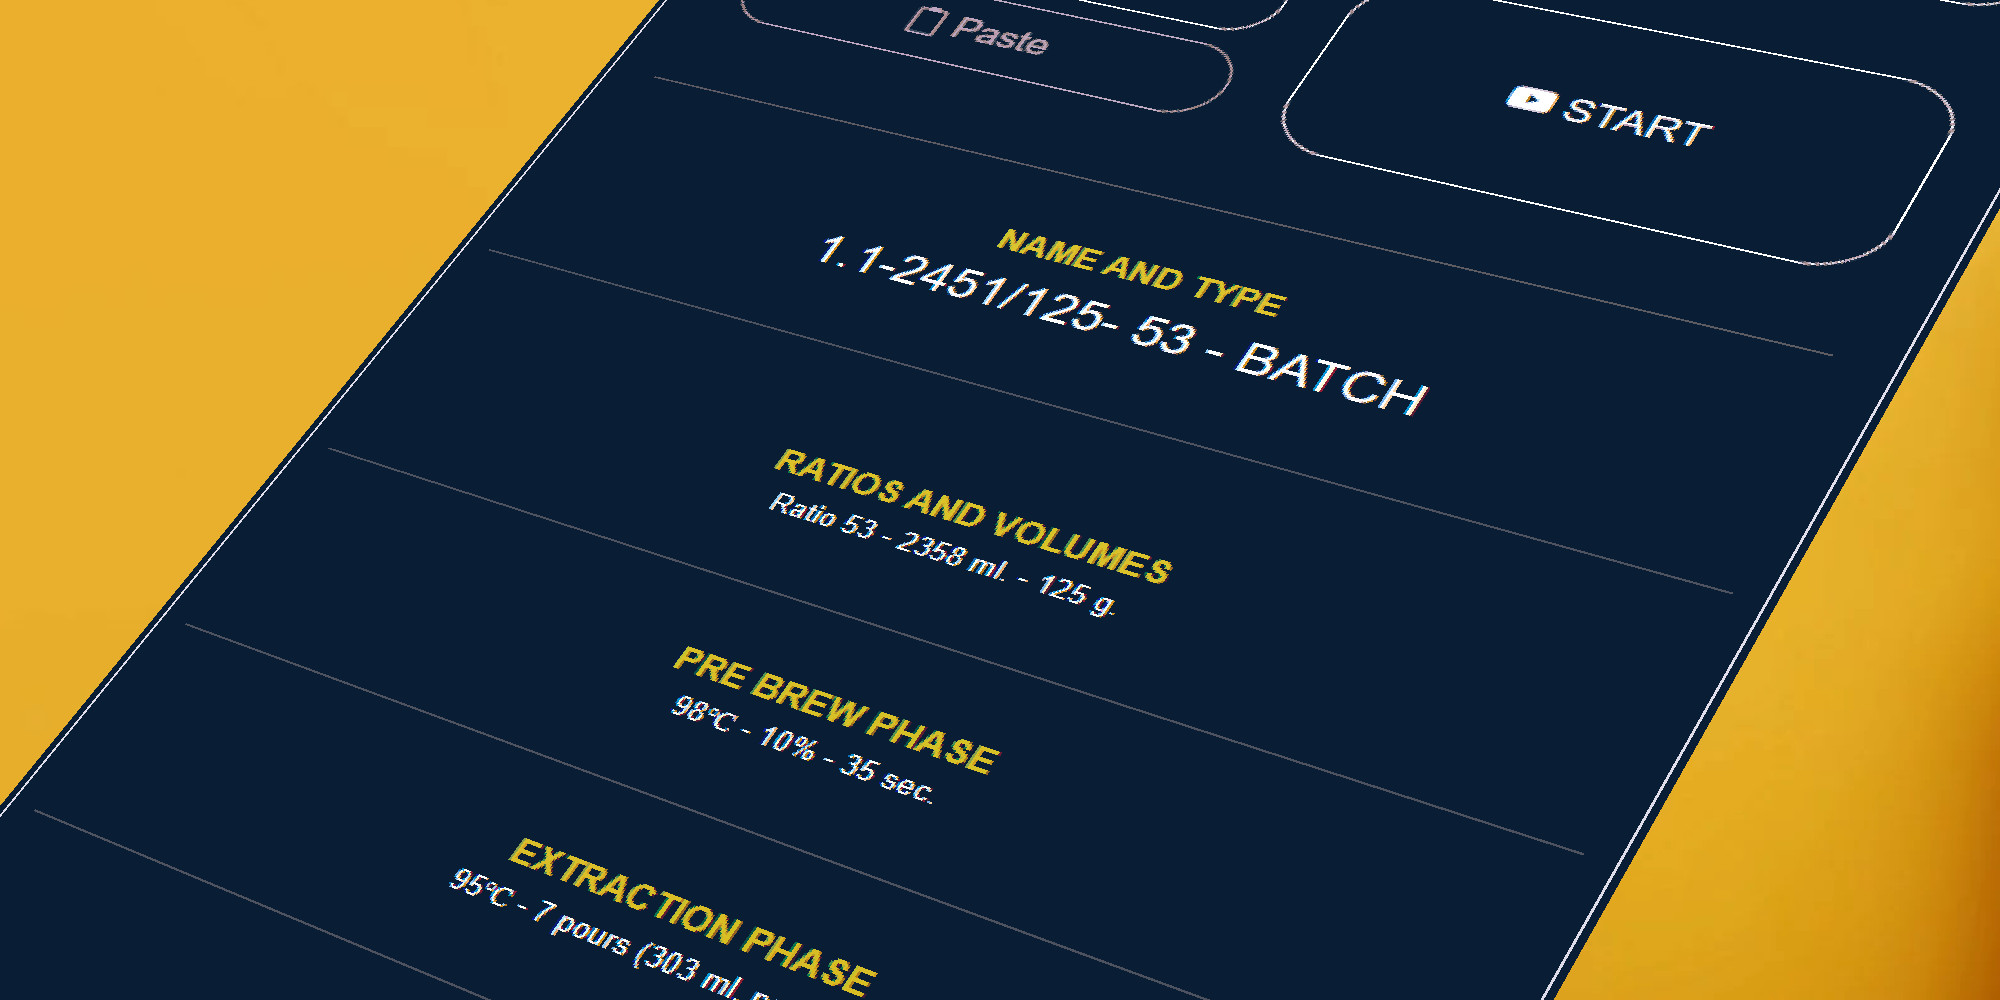
3TEMP Recipe Editor
To access information regarding parameters and options, kindly explore the designated areas on the image. Details about the active area will be displayed here.
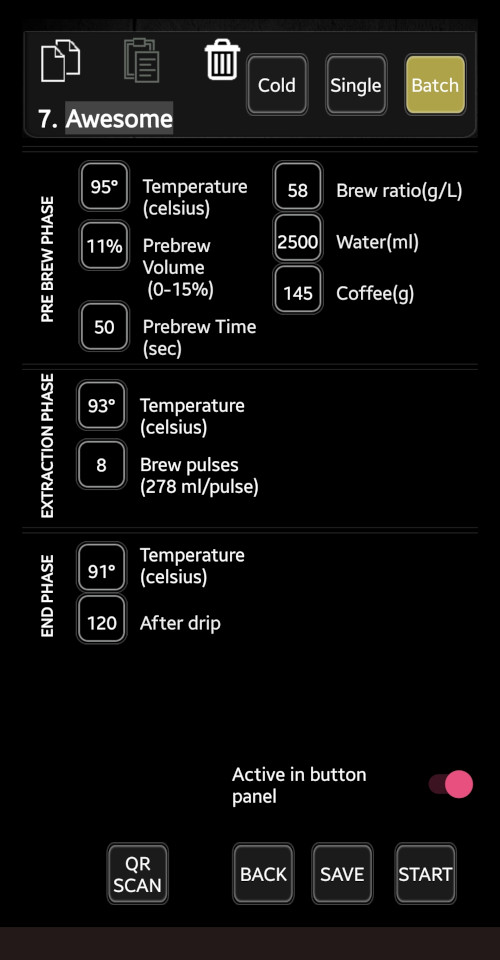
Top controls
Copy ‘n paste
To duplicate a recipe and make adjustments in a copy, simply click on the designated “Copy” button .
The “Paste” button becomes active once you’ve copied a recipe. When you click on this button, it will automatically fill in the copied parameters of the recipe into the respective fields. This makes the process much more convenient for you.
Please exercise caution when using the “Delete” button , as it will reset all parameters and options.
Type
Choose between “Batch” (standard), “Single” and “Cold”.
Select Batch brew if you brew volumes more than 700 ml
The Single brew option allows you to brew less than 700 ml of coffee. To do this, you’ll need a 3TEMP V60 insert, which is exclusively compatible with the Brew Basket Stainless Steel.
Cold brew is a special feature of the 3TEMP brewers. While the Hipster 1 and the Hipster UC includes this feature, it is an option for the PULS, KOBRA and WALL.
Recipe label
You have the option to give your recipe a distinctive name by entering up to 18 characters
Basic parameters
BREW RATIO (g/l)
The official SCA recommendation is 55 g/L (± 10 %)
While we recommend this as a starting point, remember that coffee varietals differ, so slight adjustments may be necessary for the perfect cup.
Also, please be aware that reducing the ratio can have a beneficial impact on the environment. READ MORE
WATER (ml)
You can set your preferred standard volume. The ratio will then automatically calculate the required coffee (g).
The standard Thermos for a 3TEMP brewer is a 2.5 litres thermos. In that case you can set a volume for 2500 ml.
COFFEE (g)
The required coffee grounds are automatically determined by the Brew Ratio (g/l) and Water (ml).
Adjusting the Coffee (g) parameter will, in turn, change the Water (ml).
Pre-brew phase
PRE-BREW TEMP
Taste-effects:
Character and Intensity
This parameter is linked to the roast level of the coffee: The lighter the roast, the lower the temperature you should set.
PRE-BREW VOLUME (0-15%)
Taste-effects:
Mouthfeel
When you’re using a brew ratio of 60 g/l, starting with a pre-brew volume of about 12% is a good idea (that’s a little over 2 grams of water for every 1 gram of coffee).
Also, remember that the grind size matters. If you grind the coffee beans finer, it’ll make your coffee taste richer and give you more coffee in your cup. But remember that a batch brewer needs a less fine grinded coffee than a home brewer.
PRE-BREW TIME (sec)
Taste-effects:
Sweetness and Intensity
The basic rule is: The lighter the roast, the longer the pre-brew time to allow unwanted carbon dioxide* to escape. A commonly suggested pre-brew time falls in the range of 40 to 60 seconds.
A combination of a high Pre-brew temp and an extended Pre-brew time may lead to over-extraction.
*) Allowing the release of carbon dioxide enhances coffee flavor in two ways.
- Initially, carbon dioxide carries a sour taste. Failing to let the coffee grounds bloom before brewing will result in this gas imparting a sour flavor to the coffee.
- Furthermore, carbon dioxide acts as a barrier to water, disrupting the brewing process. The full extraction of coffee’s aromatics and oils by water can only occur once carbon dioxide has dissipated.
READ MORE (extern link)
Extraction phase
BREW TEMP 1
Taste-effects:
Extraction and Balance
In most cases, we advise:
Dark roast => 95-99°C
Light roast => 92-96°C
Brew temp 1 should be approximately 3° – 5° lower than the Pre-brew temp to avoid over extraction
BREW PULSES (ml/pulse)
Taste-effects:
Extraction and Balance
Affects the total extraction time and how evenly the coffee grounds are extracted. Check filter basket after the brew is done. Continuous flow normally works best for 800-1200ml
End phase
BREW TEMP 2
Taste-effects:
Bitterness and Balance
Less temp => lower extraction = less bitterness in the final brew phase
Brew temp 2 should be approximately. 3° – 5° lower than the Brew temp 1 to avoid bitterness
AFTER DRIP
The ‘After Drip’ parameter does not affect the taste; it solely manages the timer to ensure the thermos remains under the brewer while any post-brew dripping occurs.
Bottom controls
Active in button panel
This slider grants you the ability to activate or deactivate the recipe in both the recipe list and the button controller.
Save the recipe
When you’re prepared to fine-tune your recipe, you can initiate the brewing process by clicking “START,” or you can choose to save the recipe. If you opt not to save your recipe, select “Back,” and you’ll exit the editor without saving your changes.
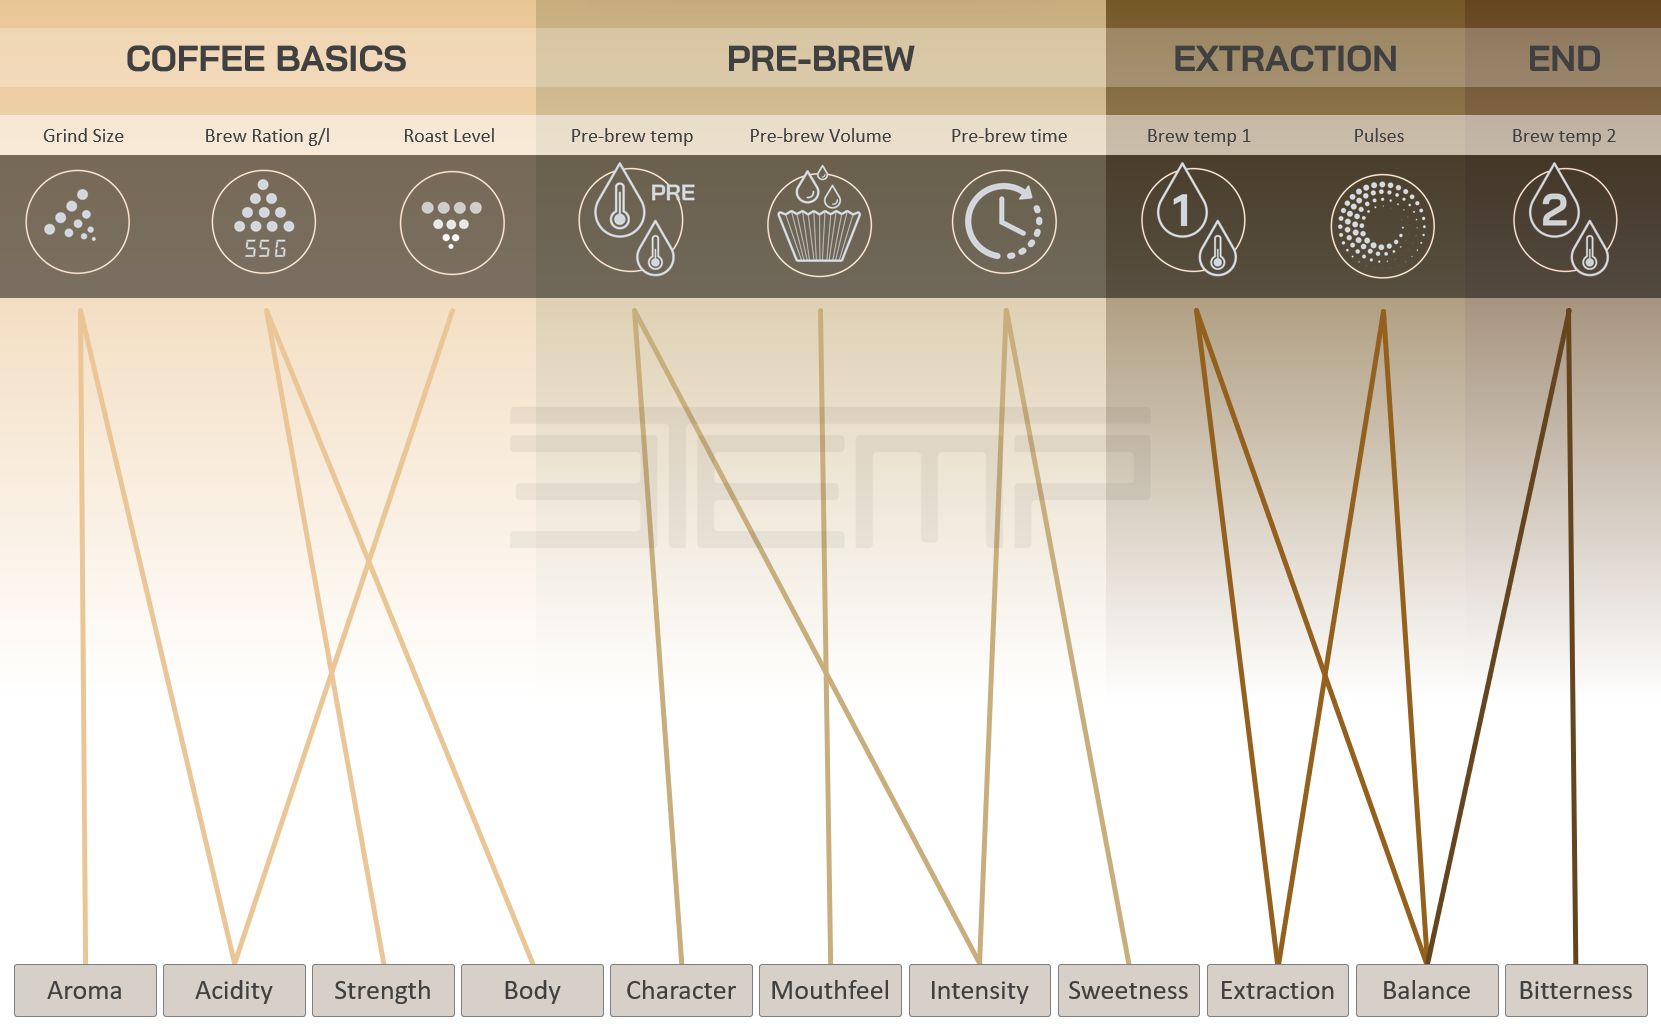
This is a straightforward explanation focusing on the primary factors that have the most influence. While there are more intricate connections between individual factors, we’ve opted for this image to keep things clear and easy to understand.
As you can observe, beyond the fundamental aspects of coffee, the pre-brew phase plays a substantial role in determining the coffee’s flavor.
This is one of the key factors contributing to the exceptional brewing results achieved with the 3TEMP brewers.